Shade structure
|
2021: Cia proposed to offer bronze casting classes, and is offering to locate her furnaces at Make.
For this, we need an outdoor, protected area to work. Because of the nature of the work, this
cannot be made from wood 2×4's.
Cia, Hubert, Rob, Phil, Dennis, Nemo (did I forget anyone?) | |||||||||||||||||||||||||||||||||||||
| (1) The basic structure consists of 4 legs, 2×4 tubing, and the roof rectangle made out of 3×3 (?? confirm) L profile. Each corner gets a 45° brace (not as shown), about 2.8' long. Size 10×20', about 9 (??confirm) feet tall, roof slope 5°. Update: Braces are at 45°, and on all sides. | 
| ||||||||||||||||||||||||||||||||||||
| The roof frame is subdivided using smaller L-profile, as shown. On each end of these
members a small bolting plate is welded.
Update: After studying snow loads, this was found to be too weak. | 
| ||||||||||||||||||||||||||||||||||||
| (2) Gusset plates are welded to the legs, and bolted elsewhere. The plates shown here are 8×8", with a 3.5×1.5" rectangular hole pattern, for 5/16 bolts. Shown here is how the plates can be used at the top corner, on the side. The top member slopes down 5°. Seems to work. Thus the same plates can be used all around, 24 total. [ In the sketch the plates are shown closer than in the real thing, in the structure the plates are about 2' apart in the hor and ver directions. ] Update: Hole patterns are different, 1/2" bolts used. | 
| ||||||||||||||||||||||||||||||||||||
| (3) The plates can be (plasma-)cut out of a 4'-wide sheet. Here is the dxf file | 
| ||||||||||||||||||||||||||||||||||||
| (4)
Choice Steel - Angle - 3 ×3 3/16 =$70.16 4 ×4 1/4 = 127.40 2 ×2 1/8 = $31.50 ---- 2 ×2 1/8 square = $78.68 2 × 1.5 = $30.90 ---- 2 × 1.5 1/8 rectangle = $80.00 Plate - 8" × 10'ft 1/8 = $49.18 8" by 10' 1/4 = $69.82 Reliance Steel - 3 ×3 3/16 =$ 75 4 ×4 1/4 = $ 138.60 2 ×2 1/8 = $ 35.25 ---- 2 ×2 1/8 square = $155 2 × 1.5 1/8 = $41.00 ---- 3 × 1.5 1/8 rectangle = $120 Plate - 8" × 10'ft 1/8 = $97 8" by 10' 3/16 = $128 | |||||||||||||||||||||||||||||||||||||
| (5)
| |||||||||||||||||||||||||||||||||||||
| (6) Turns out the 3" angle is still too bouncy over 20'. Making trusses will solve this. We will weld these out of 1×1" angle iron. | 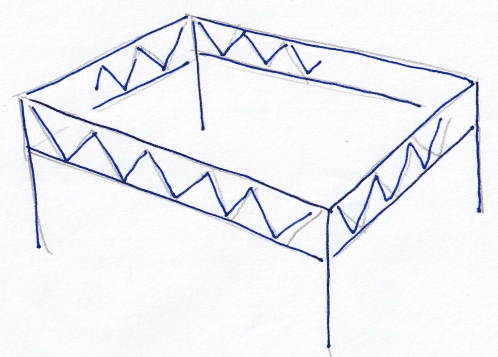
| ||||||||||||||||||||||||||||||||||||
| (7) For the webbing of the trusses we can notch (with the portable band saw) and bend a 1×1 angle Update: Where is the bandsaw? Used the Sawsall instead. | 

| ||||||||||||||||||||||||||||||||||||
| (8) This sketch shows that when the top of the truss gets welded, you can tilt it by 5° to match the slope of the roof. | 
| ||||||||||||||||||||||||||||||||||||
| (9)
This is a truss for the 20' span along the front and back. It is built from 1×1" angle. The total
length is 232" (=20' minus 2 4" leg tubes), and has a 1.5" space on either end to bolt it to the
3×3 on top.
Update: Braces (from 2×2 angle) are made part of the truss. | 
| ||||||||||||||||||||||||||||||||||||
| (10)
Load test and simulation:
| 
| ||||||||||||||||||||||||||||||||||||
| (11)
Next, start simulating the truss.
The load is derived from 30 lbs per square foot, so the total load is 20×10×30 lbs. Split between the front and back truss, and half of that, 1500 lbs, rests on our simulated half-truss. | 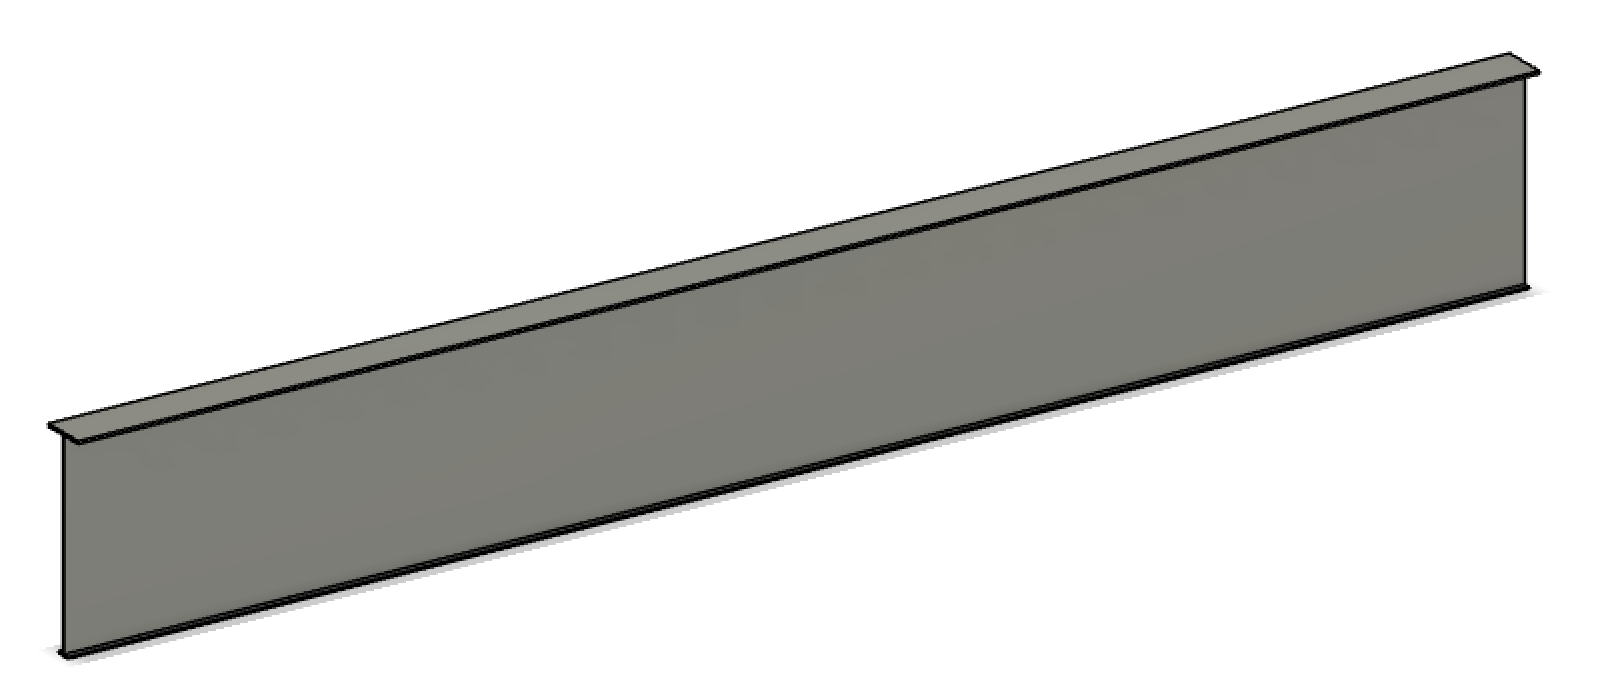
| ||||||||||||||||||||||||||||||||||||
| (12) As you can see, this beam flexes about .1" under a snow load of 3000 lbs (1500 per end). The safety margin is 2.06, which is less than the recommended 3. | 
| ||||||||||||||||||||||||||||||||||||
| (12)
Next, cut triangular holes in the vertical surface to make it look like a truss.
| 
| ||||||||||||||||||||||||||||||||||||
| (13) You can see the strength goes down by ×2, but is still not quite failing. | 
| ||||||||||||||||||||||||||||||||||||
| (14) Here the load is equivalent to a snow load of 15 lbs/sqft, a number more appropriate for Santa Fe [needs confirmation!] and the safety factor now is 2. | 
| ||||||||||||||||||||||||||||||||||||
| (15) In order to reach a safety factor of 3, increase the height of the truss. Since the strength roughly scales as the height3, I increase the web from 13" to 15". Now the safety factor is a little more than 3. | 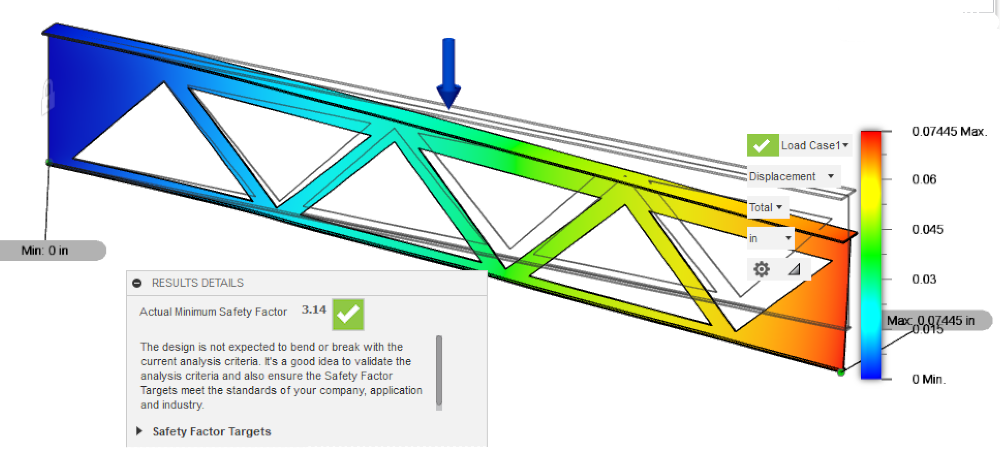
| ||||||||||||||||||||||||||||||||||||
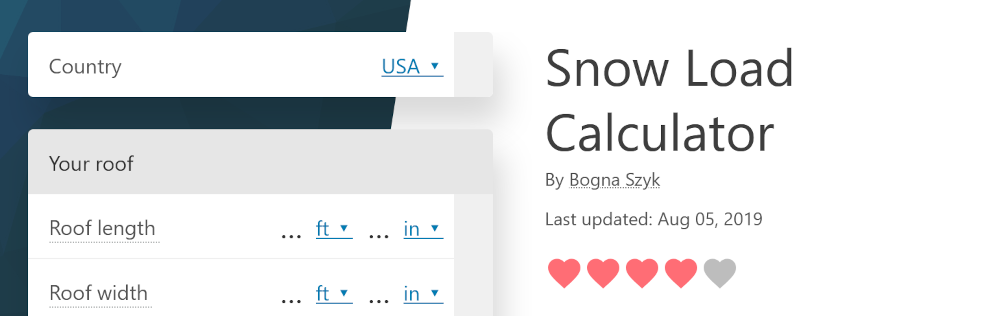
| (16) From Cody I got this link about roof loads. If I understand this site, when I choose New Mexico, the total permissible load is 18" of snow for a total of 2100 lbs on a 10×20 roof, so from here on I'll use this number. |
| ||||||||||||||||||||||||||||||||||||
|
(17) Here is a possible scheme: First, we have 3" angle all around on top, plus gusset plates and 45° braces all around. This provide all the racking strength we need. The 20-foot spans front and back are turned into trusses, as described above, using 1" angle. As we saw on Wednesday, the 10' front-to-back span is too large for simple angle iron, so we make trusses out of 1" angle. Per unit of length, a truss made out of 1" angle is 30% lighter and 30% cheaper, and much much stronger than 3" angle. Cost etc. 20' trusses: - 3" angle we have - 1" angle: 20+20+28' = 68' (×2) = $102 10' trusses: - 1" angle: 10+10+14' = 34' (×5) = $128 Purlins: item 226707 at Lowe's. We bought 20 (10-footers) for $100 | 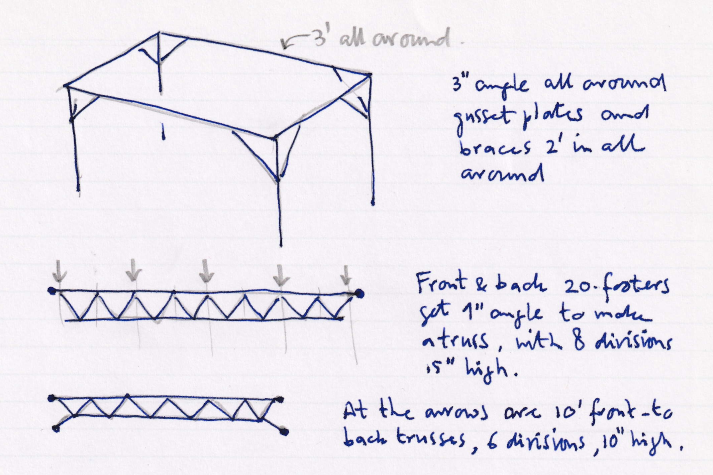
Note on the trusses: The (vertical bending) strength is determined by the height. The amount of steel to make a truss is independent of the height: as the number of triangles changes, the total length of the diagonals stays the same. | ||||||||||||||||||||||||||||||||||||
| (18) Here is a cross section showing the front and back 20-foot trusses in yellow. You see the 3×3" angle at the top is tilted by 5°, so it needs some shimming when it is welded to the vertical 1×1s. The bottom angle is 1×1. In green is the 10-foot truss. At the bottom left and right of the webbing are arms that conect to the bottom rail of the yellow trusses, with a single bolt. On the top, part of the angle is cut away so there is a lip that rests on top of the 3×3, and is bolted with 2 bolts on each end. | 
| ||||||||||||||||||||||||||||||||||||
| (19) Procedure:
| 
| ||||||||||||||||||||||||||||||||||||
| |||||||||||||||||||||||||||||||||||||
| (20) There is a full Fusion model, plus 1:1 templates of each end. | 
| ||||||||||||||||||||||||||||||||||||
| (21) Next issue: interference between the braces and the trusses. Braces+gussets are the ones shown in (17) (top), and the front 20' truss is shown in (9). One solution is to mount the braces (these are 2×2angles) on the outside of the gusset plates, but this is ugly. A neater solution is to integrate the 2×2 brace into the 1×1 truss. | 
| ||||||||||||||||||||||||||||||||||||
| (22)
How wide?
[ Go back and modify the 10' truss above, which assumed 15"] | 
| ||||||||||||||||||||||||||||||||||||
| (23) 20ft truss | 
| ||||||||||||||||||||||||||||||||||||
| (24) Side trusses: There is 120-2-2=116" between the legs. The original 24" braces and 3 23" divisions is 1" too much, so shorten the braces by 1/2" each. If I now tilt the legs by 5.7° the braces meet the legs at different heights. But if I shift the weld point over by 2 3/8", the braces end up at the same distance (23.5") from the roof. | 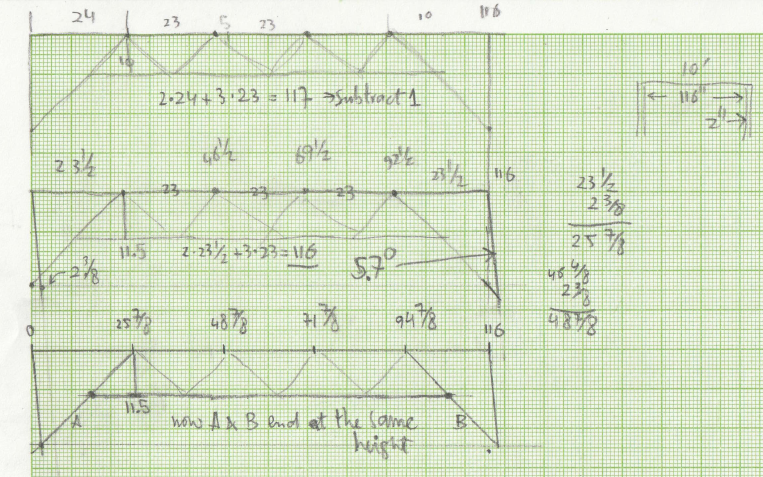
| ||||||||||||||||||||||||||||||||||||
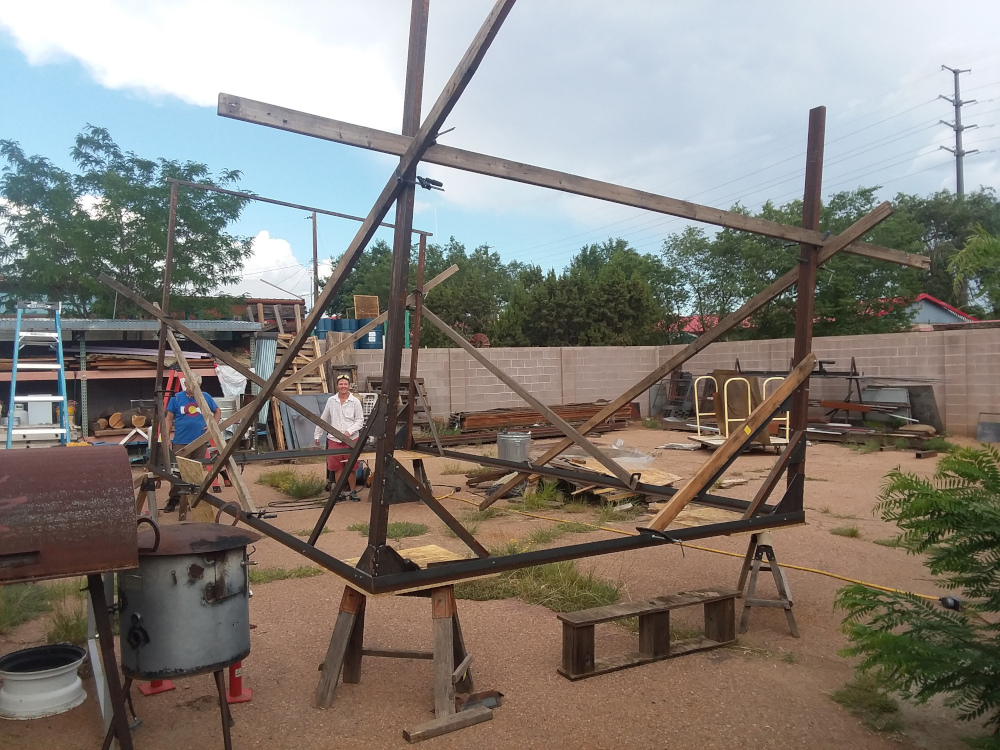
| (25) Progress! We are constructing the thing upside down. The 3×3 angles are mitered, and placed on 4 saw horses. The leg on the right in this picture is a back (short) one, and therefore angles out by 5° and is held in place by 2×4s. You can see the 45° braces, for now held in place with 1/4" bolts and clamps. Once the 4 legs are in place with 2 braces each, we'll add the truss webbing.
| 
| ||||||||||||||||||||||||||||||||||||
| (26) We tapered the front legs by 5° | 
| ||||||||||||||||||||||||||||||||||||
| (27) 27 July: all 4 legs in place, held by gusset plates and 2×2 braces, with (temporary 1/4") bolts and tackwelds. Next:
| 
| ||||||||||||||||||||||||||||||||||||
| |||||||||||||||||||||||||||||||||||||
| (29)
Status on 8 August: 3 trusses done (2 sides, back), 4 more to go. | 
| ||||||||||||||||||||||||||||||||||||
| (30) The structure comes apart as follows:
| 
| ||||||||||||||||||||||||||||||||||||
| (31) 20 August: all trusses finished. Some detail work remains before we remove the legs and flip the truss structure over to add the roof panels.
| 
(32) | With the trusses and legs finished, the structure is taken apart. Trusses (7) stacked on the sawhorses, legs on the ground.
(33) | 8 October 21: We cleared the area along the bamboo, except for the blue scissor lift (which we could not move). We put up the two sides, using the blue lift to prop the left one up.
|
(34) | 9 October 21: The truss structure is up.
|
(35) |
xxx
| (36) |
xxx
| | |||||||||||||||||||||||||||


