The InterPlanetary Water Rocket Society
Notebook
Rev. 6/8/05
Water Rockets at
School
Other
Water Rocket Sites on the Web
Contents:
A
comment from my friend
Jean
Berthelot has inspired me to post a picture of my
rockets.
These rockets are usually Dr Pepper bottles with conical necks.
Some
have been shrunken from 500 ml to 400 ml using boiling water. The
two tall bottles on the left are joined bottom to bottom for larger
motor
volume. The noses are half tennis balls, attached using hot melt
glue and colored electrical tape. The fins are corrugated plastic
sign board friction fitted into report cover spines. The spines
are
glued to the bottles with either low temp hot melt glue (faster) or
Household
Goop (stronger). Recovery is ballistic, the fins typically pop
off
without damage. These rockets fly fast and very high. They
make a very exciting whistling sound as they come home, discouraging us
from trying to catch them.
They do not fly as fast or
as high as my fluorescent
tube cover rockets fly.
Gliding
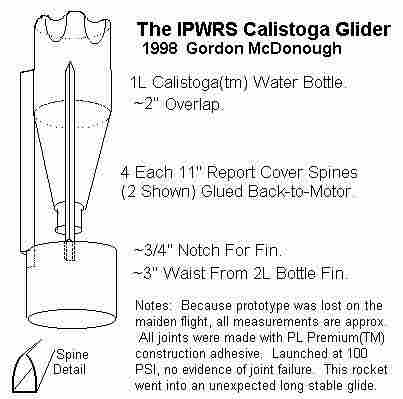
Calistoga Rocket

This
rocket took
off vertically at 100PSI and went into a flat stable glide. It was lost
some 300 feet from the launch site on the roof of a building. A sketch
with approximate dimensions follows. I have seen and heard of behavior
similar to this several times since with similar rockets.
More recent launch
successes
have involved smaller bottles, tubular fins or corrugated plastic fins
inserted in the report cover spines, and a half tennis ball nose.
See Above.
In 2005, The Alameda Middle School Water Rocket Group built a number of
gliders with two liter bottles and typically oversized fins glued
directly to the bottles. We hot glue tack the fins to the
bottle, and then reinforce the joint with PL Premium construction
adhesive. Bottles that glided typically had fins half way up
their length.
We
also had a great success cutting the neck off a three liter bottle,
inserting and gluing (PLP) a two liter bottle neck inside it, and with
oversized (by eye) fins, at about 100 psi convinced this one to fly out
of sight. We never did get it back as it sailed off into the
neighborhood behind the bleachers. We were launching from the
center of the football field in the school's rocket range.
|
Return To G. McD's Home
Page
Why Tube Launchers?
They are elegant and
effective.
During any open nozzle* launch, the water is expelled in a tiny
fraction
of a second. Acceleration is almost immediate, and the rocket's flight
is almost entirely ballistic. This all starts with both the rocket and
it's 'fuel' standing still. With a tube launcher, the initial thrust
takes
place with very little loss of water, and lasts the length of the
launch
tube. At that point, not only the rocket but also it's considerably
more
massive fuel are already traveling at speed. Any loss of pressure up to
this point is partially offset by air entering the rocket from the
launch
tube.

*An open nozzle launch uses the original
dimensions
of the bottle's mouth for the nozzle. This is not the only way to
launch
these rockets, nor is it going to result in the highest performance. It
is
probably the easiest. Some people like to fasten other sorts of nozzles
inside the bottle mouth. (There is agreement in the water rocket
community
that an open mouth is a maximum desirable opening.) An intriguing
alternative
is the so-called T-nozzle, which employs a full size launch tube for
initial
acceleration, but then a fitting drops into the nozzle to reduce and
extend
the thrust over time. For something with as little mass and as much
drag
as a soda pop bottle, this can make a lot of difference.

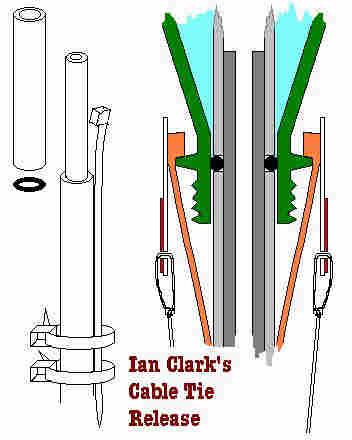
Cross-Section Key:
WaterMotorLaunch Tube
Sleeve'O'
Ring
Cable TiesRetainerTape
This drawing portrays my version of Ian
Clark's
Cable Tie Release. Cable ties are used by electricians to bind wires
together.
I have only shown one on the left, but I use as many as fit around the
launch tube. There is a #94 rubber 'O' ring between the upper and lower
parts of the launch tube. The upper part of the launch tube is snug on
the inner sleeve, but is removable to exchange with others of lengths
appropriate
to my motors. (Long motor / long tube.) The ties are held engaged with
the collar on the motor by a ring of flourescent tube cover about two
inches
long. To increase visibility from the pumping station, there is red
electrical
tape around the ring. The ring is light enough to hold itself up with
friction
before pumping starts. The pull down strings go to a metal ring. The
remote
release string is tied to a second ring on the launcher base, it passes
up through the upper ring, back down through the lower ring and out
horizontally
to the launch crew.
Assembly is a bit tricky. I use light rubber
bands
and masking tape to hold the ties while I position them. I place a
bottle
on the launch tube to line up the tie heads with the bottle's collar.
When
everything looks right, I put some cable ties around the rest (Drawing
on the left), and tighten them. If everything still looks good, I smear
warm epoxy all over this section. (Warm so it flows better.) Then I
trim
all the ends flush. If one desires to experiment with different bottle
placings, one can use hose clamps without the glue, but it results in a
clunky looking job and the clamp can get in the way of the retaining
ring.
Top
Contact me, Gordon McDonough, at gordo@hubwest.com